Blog

  • Using generative AI to suggest outfits based on today’s weather

    One of the tasks I waste time on every day is checking what the weather will be like and then staring into my wardrobe trying to work out what to wear. So I decided to create an app to do both of these jobs for me!

    The backend

    To interact with the AI, I set up a simple Django app. I won’t go into the details too much here, as I did a step-by-step guide to setting up a Django + react app in the previous post. Instead, I’ll show the parts that are most relevant to this task.

    Getting the forecast

    1. Getting the weather forecast. I used OpenWeatherMap’s free API to generate 3-hourly forecasts
    def get_weather(lat, lon):
        complete_url = f"http://api.openweathermap.org/data/2.5/forecast?lat={lat}&lon={lon}&appid={OPENWEATHER_API_KEY}"
        response = requests.get(complete_url)
        forecast_data = response.json()
        return forecast_data

    to run this function, you need the latitude and longitude of your location, which you can also work out for your city, using OpenWeatherMap’s API:

    def get_lat_lon():
        country_code = "GB"
        city_name = "London"
        limit=3
        geocoding_url = f"http://api.openweathermap.org/geo/1.0/direct?q={city_name},{country_code}&limit={limit}&appid={OPENWEATHER_API_KEY}"
        geo_response = requests.get(geocoding_url)
        geo_data = geo_response.json()[0]
        return geo_data['lat'], geo_data['lon']

    2. Based on these forecasts, we want to generate a human-friendly string describing the weather and the appropriate clothing choices for it:

    
    HOT_OUTFIT_CHOICES =  ['tank top and shorts', 'summer dress', 't-shirt, skirt and sandals']
    MILD_OUTFIT_CHOICES = ['jeans and t-shirt', 'dress and jacket', 'maxi skirt and light cardigan']
    CHILLY_OUTFIT_CHOICES = ['jeans and sweater', 'leggings and sweater', 'sweater and skirt']
    COLD_OUTFIT_CHOICES =  ['coat, hat, and gloves', 'winter jacket and boots']
    
    def get_suggestion_str(temp, weather=None):
        rain_str = ""
        if weather:
            if "rain" in weather:
                rain_str =  "It's raining! Don't forget your umbrella and raincoat."
        if temp > 20:
            temp_str =  f"It's hot outside! Wear light clothing like: {', '.join(HOT_OUTFIT_CHOICES)}"
        elif 10 <= temp <= 20:
            temp_str = f"The weather is mild. Wear comfortable clothing like: {', '.join(MILD_OUTFIT_CHOICES)} "
        elif 5 <= temp < 10:
            temp_str = f"It's a bit chilly. Wear warm clothing like: {', '.join(CHILLY_OUTFIT_CHOICES)}"
        else:
            temp_str =  f"It's cold outside! Wrap up warm with clothing such as: {', '.join(COLD_OUTFIT_CHOICES)}"
        return f'{temp_str} {rain_str}'

    Note that the inputs, weather and temp are both extracted from forecast_data that we saw earlier. You can change the outfit choices to suit your personal taste.

    Generating outfit images

    The next step is to generate prompts based off this weather data to feed to our image generation model, StableDiffusion. This is just a quick example prompt, but you could personalise it even more by changing/ removing the gender and adding more specific query terms.

    def suggest_outfit_prompt(temp):
        if temp > 20:
            return f"woman in stylish outfit containing {' or '.join(HOT_OUTFIT_CHOICES)}"
        elif 10 <= temp <= 20:
            return f"woman in stylish outfit containing {' or '.join(MILD_OUTFIT_CHOICES)}"
        elif 5 <= temp < 10:
            return f"woman in stylish outfit containing {' or '.join(CHILLY_OUTFIT_CHOICES)}"
        else:
            return f"woman in stylish outfit containing {' or '.join(COLD_OUTFIT_CHOICES)}"
    

    Now we want to load the model. I’m on a MacBook with MPS, but if you have cuda, you could also use that.

    def load_gen_pipeline():
        model_id = "nota-ai/bk-sdm-small" #"CompVis/stable-diffusion-v1-4"
        pipe = StableDiffusionPipeline.from_pretrained(
            model_id,
            torch_dtype=torch.float16
        )
        pipe.to("mps")  # Use Apple's MPS backend
        pipe.vae = AutoencoderTiny.from_pretrained(
            "sayakpaul/taesd-diffusers",
            torch_dtype=torch.float16,
            use_safetensors=True,
        ).to("mps")
        return pipe

    Then we can use this pipeline to generate images from our prompts like this:

    def generate_fashion_images(all_temps):    
        if not GENERATED_IMAGE_DIR.exists():
            GENERATED_IMAGE_DIR.mkdir()
    
        avg_temp = sum(all_temps)/len(all_temps)
        prompt = suggest_outfit_prompt(avg_temp)
        print(prompt)
        pipe = load_gen_pipeline()
        img_paths = generate_images(prompt, pipe)
        print(f"Generated some suggestions for {prompt}")
        return img_paths

    Here I’m using a distilled version of Stable Diffusion, and a distilled version of the autoencoder, to reduce the amount of compute needed and speed up the results.

    All that’s left is to create 2 Django views, one to get the forecasts, and one to generate images (this will require a list of forecast temperatures as input), then you can work on your frontend display and you’re done!

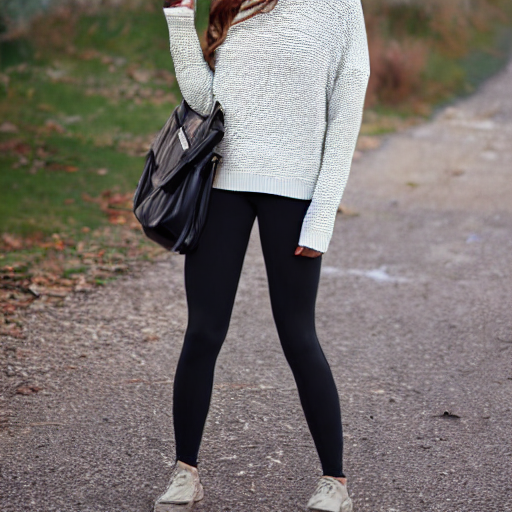
    As you can see in the example shown above, the generated images aren’t very realistic! This is due to the distilled model and distilled autoencoder we used for this simple example. With more compute, we could use the original Stable Diffusion model and autoencoder, which generates much more realistic images like the ones below.

  • A simple way to create AI-powered apps

    Integrating AI capabilities into your app has never been easier. In this blog post we’ll walk through the process of creating a simple app powered with Django for the backend, React for the frontend and LangChain to make requests to a Large Language Model (LLM).

    In this example, we’ll create a recipe suggestion app that consults the AI model to provide suggestions, based on a user’s requirements.

    1. Set up the Django backend

    1. Install Django
    pip install django

    2. Create a Django project and app:

    django-admin startproject myproject
    cd myproject
    django-admin startapp recipes

    3. Configure myapp/settings.py. In particular, update the list of INSTALLED_APPS

    INSTALLED_APPS = [
        'recipes',
        'django.contrib.admin',
        'django.contrib.auth',
        'django.contrib.contenttypes',
        'django.contrib.sessions',
        'django.contrib.messages',
        'django.contrib.staticfiles',
        'corsheaders',
        'rest_framework',
    ]

    and MIDDLEWARE:

    MIDDLEWARE = [
        'django.middleware.security.SecurityMiddleware',
        'django.contrib.sessions.middleware.SessionMiddleware',
        'corsheaders.middleware.CorsMiddleware',
        'django.middleware.common.CommonMiddleware',
        'django.middleware.csrf.CsrfViewMiddleware',
        'django.contrib.auth.middleware.AuthenticationMiddleware',
        'django.contrib.messages.middleware.MessageMiddleware',
        'django.middleware.clickjacking.XFrameOptionsMiddleware',
    ]

    and finally, replace the ROOT_URLCONF with the below, and add a variable named CORS_ORIGIN_WHITELIST:

    ROOT_URLCONF = 'recipes.urls'
    CORS_ORIGIN_WHITELIST = [
         'http://localhost:3000'
    ]

    4. Create a Django view for handling the LLM requests. In recipes/view.py add the following view:

    from rest_framework.decorators import api_view
    from rest_framework.response import Response
    
    @api_view(['GET'])
    def get_recipes(request):
        return Response({'recipes': []})
    

    For now, this will just return an empty list. We’ll come back to this view later to make our request to the LLM.

    5a. Set up URLs. In myapp/urls.py, add a URL conf to point to additional URLs in our ‘recipe’ app:

    from django.contrib import admin
    from django.urls import include, path
    
    urlpatterns = [
        path("admin/", admin.site.urls),
        path("recipes/", include("recipes.urls")),
        
    ]

    Add a file recipes/urls.py, and add a URL for the view we just added:

    from django.urls import path
    from django.contrib import admin
     
    from . import views
    
    urlpatterns = [
        path("admin/", admin.site.urls),
        path("recipes", views.get_recipes, name="get_recipes"),
    ]

    6. Run the server.

    python manage.py runserver

    If you visit localhost:8000/get_recipes in your browser, it should look like this:

    2. Setting up the React frontend

    1. Create a React app:
    npx create-react-app frontend
    cd frontend

    2. Install react-boostrap to format our frontend nicely

    npm i react-bootstrap bootstrap

    and make sure to include this line in index.js

    import 'bootstrap/dist/css/bootstrap.min.css';

    3. Create components to display the output of the view we just created. First, create a file called components/RecipeDisplay.js and add the following:

    import { Container, Row, Col, Card, ListGroup } from 'react-bootstrap';
    
    const RecipeDisplay = ({ recipes }) => {
        return (
          <Container>
            <h2>Recipes</h2>
            <Row>
              {recipes.map((recipe, index) => (
                
                <Col md={6} key={index}>
                  <Card className="mb-4">
                    <Card.Header>{recipe.title.replaceAll("*","")}</Card.Header>
                    <Card.Body>
                      <Card.Title>Ingredients</Card.Title>
                      <ListGroup variant="flush">
                        {recipe.ingredients.map((ingredient, idx) => (
                          <ListGroup.Item key={idx}>{ingredient}</ListGroup.Item>
                        ))}
                      </ListGroup>
                      <Card.Title className="mt-3">Instructions</Card.Title>
                      <ListGroup variant="flush">
                        {recipe.instructions.map((instruction, idx) => (
                          <ListGroup.Item key={idx}>{instruction}</ListGroup.Item>
                        ))}
                      </ListGroup>
                    </Card.Body>
                  </Card>
                </Col>
              ))}
            </Row>
          </Container>
        );
      };
    
      export default RecipeDisplay;

    4. Now create a file called components/RecipeForm.js and add the code to create our React form:

    import { useEffect, useState } from 'react';
    import { Button, Form, Row, Spinner } from 'react-bootstrap';
    import RecipeDisplay from './RecipeDisplay';
    
    function RecipeForm() {
        const [requirement, setRequirement] = useState('noRequirement');
        const [cookTime, setCookTime] = useState('underFifteen');
        const [ingredients, setIngredients] = useState('');
        const [recipes, setRecipes] = useState([]);
        const [loading, setLoading] = useState(false);
      
        useEffect(() => { 
          getRecipes();
        }, [requirement, cookTime]);
      
        const getRecipes = async () => {
          setLoading(true);
          const event_obj = { cookTime: cookTime, diet: requirement, ingredients: ingredients };
          try {
            const response = await fetch(`http://localhost:8000/recipes`, {
              method: 'POST',
              headers: {
                'Content-Type': 'application/json',
              },
              body: JSON.stringify(event_obj),
            });
      
            if (!response.ok) {
              const errorData = await response.json();
              throw new Error(errorData.detail || 'Request failed');
            }
      
            const responseText = await response.json()
            const completeRecipes = parseRecipes(responseText);
            
            setRecipes(completeRecipes);
          } catch (error) {
            console.error('Error retrieving recipes:', error);
          } finally {
            setLoading(false);
          }
        };
      
        const parseRecipes = (data) => {
          const sections = data['recipes']//.split(/\d+\.\s+/).filter(Boolean);
      
          return sections.map(section => {
            const lines = section.split('\n').filter(Boolean);
            const title = lines[0].trim();
            const ingredientsIndex = lines.findIndex(line => line.toLowerCase().startsWith('**ingredients:'));
            const instructionsIndex = lines.findIndex(line => line.toLowerCase().startsWith('**instructions:'));
            const ingredients = lines.slice(ingredientsIndex + 1, instructionsIndex).map(line => line.replace('-', '').trim());
            const instructions = lines.slice(instructionsIndex + 1).map(line => line.replace(/^\d+\.\s*/, '').trim());
      
            return { title, ingredients, instructions };
          });
        };
      
        const onRequirementChange = (event) => {
          const { value } = event.target;
          setRequirement(value);
        };
      
        const onCookTimeChange = (event) => {
          const { value } = event.target;
          setCookTime(value);
        };
      
        const onIngredientsChange = (event) => { 
          setIngredients(event.target.value); 
        };
      
        const onIngredientsSubmit = (event) => {
          event.preventDefault();
          getRecipes();
        };
      
        return (
          <div>
            <Form onSubmit={onIngredientsSubmit}>
              <Row>
                <Form.Label>Do you have any dietary requirements?</Form.Label>
                <Form.Group>
                  <div key={`inline-radio`} className="mb-3">
                    <Form.Check
                      inline
                      label="no requirement"
                      name="noRequirement"
                      type="radio"
                      id="diet"
                      value="noRequirement"
                      checked={requirement === "noRequirement"}
                      onChange={onRequirementChange}
                    />
                    <Form.Check
                      inline
                      label="vegetarian"
                      name="vegetarian"
                      type="radio"
                      id="diet"
                      value="vegetarian"
                      checked={requirement === "vegetarian"}
                      onChange={onRequirementChange}
                    />
                    <Form.Check
                      inline
                      label="vegan"
                      name="vegan"
                      type="radio"
                      id="diet"
                      value="vegan"
                      checked={requirement === "vegan"}
                      onChange={onRequirementChange}
                    />
                  </div>
                </Form.Group>
              </Row>
              <Row>
                <Form.Label>How much time do you want to spend? (Select multiple)</Form.Label>
                <Form.Group>
                  <Form.Check
                    inline
                    label="under 15 mins"
                    name="underFifteen"
                    value="underFifteen"
                    type="radio"
                    id="cookTime"
                    checked={cookTime === "underFifteen"}
                    onChange={onCookTimeChange}
                  />
                  <Form.Check
                    inline
                    label="15-30 mins"
                    name=" "
                    value="fifteenToThirty"
                    type="radio"
                    id="cookTime"
                    checked={cookTime === "fifteenToThirty"}
                    onChange={onCookTimeChange}
                  />
                  <Form.Check
                    inline
                    label="30-60 mins"
                    name="thirtyToSixty"
                    value="thirtyToSixty"
                    type="radio"
                    id="cookTime"
                    checked={cookTime === "thirtyToSixty"}
                    onChange={onCookTimeChange}
                  />
                  <Form.Check
                    inline
                    label="60 mins +"
                    name="sixtyOrMore"
                    value="sixtyOrMore"
                    type="radio"
                    id="cookTime"
                    checked={cookTime === "sixtyOrMore"}
                    onChange={onCookTimeChange}
                  />
                </Form.Group>
              </Row>
              <Row>
                <Form.Group>
                  <Form.Label>Are there any ingredients you want to include? (separate with commas)</Form.Label>
                  <Form.Control as='textarea' onChange={onIngredientsChange} rows={2} />
                  <Button variant="outline-secondary" id="ingredients" type="submit">
                    Submit
                  </Button>
                </Form.Group>
              </Row>
            </Form>
            {loading ? (
              <div className="text-center">
                <Spinner animation="border" role="status">
                </Spinner>
                <p>Loading...</p>
              </div>
            ) : (
              <RecipeDisplay recipes={recipes} />
            )}
          </div>
        );
      }
    
    export default RecipeForm;

    5. And finally, update the code in App.js to display the components we just created:

    import './App.css';
    import { Container, Row} from 'react-bootstrap';
    import RecipeForm from './components/RecipeForm';
    
    function App() {
      return (
        <Container>
          <Row>
            <RecipeForm />
          </Row>
        </Container>
      );
    }
    
    export default App;

    6. Now run npm start to see the app you’ve just created!

    There should be a blank space under Recipes, as our Django view returns an empty list still. The final piece of the puzzle is to have it generate a list of recipes using an LLM!

    3. Make requests to the LLM

    To run this example using LangChain, you’ll need to create an account with OpenAI and register for an API key. Once you’ve done that, paste your API key in a .env file in the root folder of your project. Then update the Django view in recipes/view.py like this:

    import json
    import os
    from dotenv import load_dotenv
    
    from django.shortcuts import render
    from langchain_openai import ChatOpenAI
    from langchain_core.messages import HumanMessage, SystemMessage
    from rest_framework.decorators import api_view
    from rest_framework.response import Response
    
    
    def create_human_message(diet, cook_time, key_ingredients):
        if diet == 'noRequirement':
            diet = ''
        if cook_time == 'underFifteen':
            cook_time_str = 'under 15 minutes'
        elif cook_time == 'fifteenToThirty':
            cook_time_str = '15 to 30 minutes'
        elif cook_time == 'thirtyToSixty':
            cook_time_str = '30 to 60 minutes'
        elif cook_time == 'sixtyOrMore':
            cook_time_str = '60 minutes or more'
    
        key_ingredients_list = [x.strip() for x in key_ingredients.split(',')]
    
        if key_ingredients:
            key_ingred_str = f'that include {", ".join(key_ingredients_list)}'
        else:
            key_ingred_str = ''
        
        human_msg_str = f"Give me some recipes for {diet} dinners that I can make in {cook_time_str} {key_ingred_str}"
        print(human_msg_str)
    
        return HumanMessage(content=human_msg_str)
    
    
    @api_view(['GET', 'POST'])
    def get_recipes(request):
        load_dotenv() 
        openai_api_key = os.getenv("OPENAI_API_KEY")
        if not openai_api_key:
            print('api key not found')
            return Response({'message': 'OpenAI API key not found'}, status=400)
        body = json.loads(request.body)
        diet = body.get('diet', '')
        cook_time = body.get('cookTime', 'fifteenToThirty')
        key_ingredients = body.get('ingredients', '')
    
        human_message = create_human_message(diet, cook_time, key_ingredients)
        system_message = SystemMessage(
            content="You are an intelligent chatbot designed to help people find recipes from the web"
        )
    
        messages = [
        system_message,
        human_message
        ]
    
        model = ChatOpenAI(
            model="gpt-4o-mini",
            api_key = openai_api_key
        )
        response = model.invoke(messages)
        recipes = response.content.split('###')[1:]
    
        return Response({"recipes": recipes})

    Now refresh your browser on localhost:3000 and you should you can use your app to search for recipes!

    There you have it – your own AI-powered app! There is a bit of loading time to make the request to the LLM and retrieve the results but you could upgrade this by providing a streamed response, to show each chunk of text as it is returned.